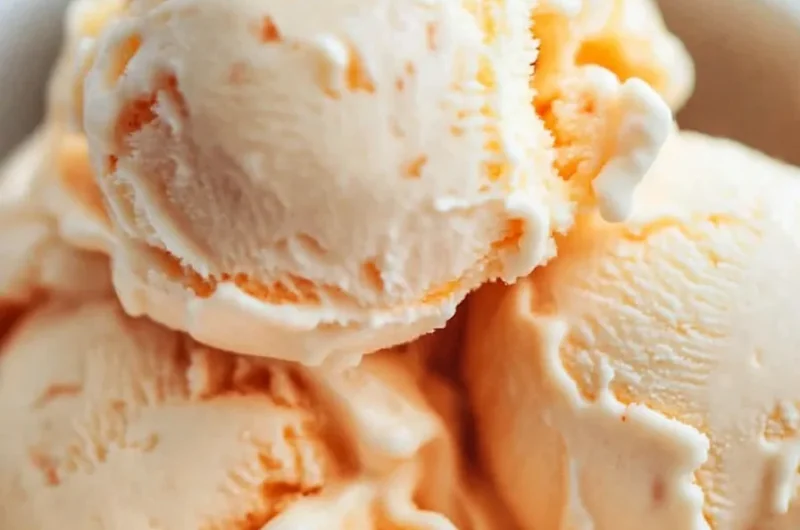
Orange Creamsicle Ice Cream is a delightful treat that instantly transports you to warm sunny days. This creamy dessert combines the zesty flavor of orange with the smoothness of vanilla, creating a nostalgic taste that’s both refreshing and satisfying. From children to adults, everyone can enjoy this amazing ice cream that captures the essence of summer in every scoop. Whether you’re throwing a summer party, having a picnic, or simply looking for a sweet way to cool down, this recipe is a perfect way to treat yourself and your loved ones.
Imagine a hot afternoon, and you take a moment to savor a scoop of Orange Creamsicle Ice Cream. The creamy texture melts in your mouth while the bright orange flavor dances on your taste buds. With each bite, you can recall your childhood memories of ice cream trucks and backyard parties. In this guide, you’ll learn how to make this wonderful ice cream from scratch, why it’s a fan favorite, and tips on serving it to ensure a memorable experience.
Throughout the article, we will cover everything from preparation time to step-by-step instructions, giving you all the tools you need to create this delicious treat in your home kitchen. So, grab your mixing bowls and let’s embark on this exciting culinary adventure!
Why You’ll Love This Recipe
Making Orange Creamsicle Ice Cream at home has several wonderful benefits that will keep you coming back for more. Here’s why you will absolutely love this recipe:
1. Simple Ingredients – Most of the items needed for this recipe are likely already in your kitchen, making it convenient to whip up.
2. Easy to Make – With straightforward instructions, even novice cooks can achieve great results.
3. A Crowd-Pleaser – Kids and adults alike adore the sweet and citrusy flavor, making it perfect for parties and gatherings.
4. Customizable Options – Feel free to substitute ingredients based on dietary requirements; use coconut milk for a dairy-free version or add chocolate chips for a fun twist.
5. Perfectly Creamy Texture – This recipe yields a smooth, velvety ice cream that will melt in your mouth.
6. Nostalgic Flavor Profile – The combination of orange and vanilla brings back fond childhood memories, making each scoop extra special.
With all these enticing elements combined, it’s no wonder that Orange Creamsicle Ice Cream has earned a spot in your dessert rotation!
Preparation and Cooking Time
Before diving into the world of homemade ice cream, let’s talk about the time it will take to prepare and churn this delightful dessert. Here’s a breakdown:
– Preparation Time: 15 minutes
– Chill Time: 2 hours (base)
– Churning Time: 20-25 minutes
– Total Time: Approximately 2 hours and 40 minutes, including chilling and churning.
Knowing the time required will help you plan ahead so that you can enjoy this amazing treat when you want it!
Ingredients
– 2 cups heavy cream
– 1 cup whole milk
– 1 cup granulated sugar
– 1 tablespoon vanilla extract
– 1 cup orange juice (freshly squeezed for the best flavor)
– Zest of 1 orange
– 1/2 teaspoon salt
Step-by-Step Instructions
Creating your own Orange Creamsicle Ice Cream is a straightforward process. Here are the steps to follow:
1. Combine Ingredients: In a large mixing bowl, combine the heavy cream, whole milk, and granulated sugar. Whisk until the sugar is fully dissolved.
2. Add Flavor: Stir in the vanilla extract, orange juice, orange zest, and salt. Ensure all ingredients are thoroughly mixed.
3. Chill the Mixture: Cover the bowl with plastic wrap and place it in the refrigerator for at least 2 hours. This step helps the flavors meld together and creates a smoother ice cream.
4. Churn the Ice Cream: Pour the chilled mixture into your ice cream maker. Follow the manufacturer’s instructions for churning, which typically takes about 20-25 minutes until it reaches a soft-serve consistency.
5. Transfer to Storage: Once churned, transfer the soft ice cream into an airtight container. Smooth the top with a spatula.
6. Freeze: Place the container in the freezer for an additional 2-4 hours to firm up the ice cream. This step is crucial for getting that scoopable texture.
7. Serve: Scoop out servings of your homemade Orange Creamsicle Ice Cream into bowls or cones.
Following these steps ensures that you achieve a creamy and refreshing treat that’s bursting with flavor!
How to Serve
Serving Orange Creamsicle Ice Cream is as fun as making it. Here are some fantastic ideas to elevate your serving experience:
1. Presentation: Use colorful bowls or cones to enhance the visual appeal. Consider garnishing with fresh orange slices or mint leaves for a pop of color.
2. Accompaniments: Pair the ice cream with whipped cream, crushed graham crackers, or a drizzle of chocolate or caramel sauce to create a sundae.
3. Creative Flavors: Mix scoop sizes with other ice cream flavors like vanilla, strawberry, or even chocolate to create an ice cream trio.
4. Beverage Pairing: Serve with refreshing lemonade or iced tea for a delightful summer treat.
By putting thought into your presentation and accompaniments, you create a memorable experience not only for your guests but also for yourself as you indulge in this homemade delicacy!
Additional Tips
– Use Fresh Ingredients: For the best outcome, always use fresh orange juice and zest. This enhances the flavor and gives your ice cream a vibrant taste.
– Mix Thoroughly: Ensure all ingredients are well combined in your preparation phase. This helps develop a uniform flavor throughout the ice cream.
– Freeze with Care: When
storing your ice cream, make sure to press a piece of plastic wrap directly onto the surface before sealing the container. This prevents ice crystals from forming.
– Allow to Soften: Before serving, let your Orange Creamsicle Ice Cream sit out for a few minutes. This makes scooping much easier and improves the texture.
– Experiment with Flavor Enhancements: Consider adding a splash of vanilla extract or a hint of almond extract for a deeper flavor profile.
Recipe Variation
Adding a twist to your Orange Creamsicle Ice Cream can make it even more exciting. Here are a few fun variations:
1. Citrus Medley: Mix in lemon and lime juice along with orange juice for a tropical flavor explosion.
2. Swirled Delight: Add a swirl of raspberry or strawberry puree to the mixture just before freezing for a fruity contrast.
3. Ice Cream Sandwiches: Use the ice cream to create sandwiches with chocolate chip cookies or graham crackers for a fun twist.
4. Vegan Option: Substitute coconut cream and almond milk for dairy alternatives to make a deliciously creamy vegan version.
Freezing and Storage
– Storage: To keep your Orange Creamsicle Ice Cream fresh, store it in an airtight container. It can last up to two weeks in the freezer.
– Avoid Freezer Burn: Ensure the container is sealed tightly to keep air out and to prevent freezer burn, which affects the texture and flavor.
– Scoop with Ease: If the ice cream becomes too hard after extended storage, let it soften at room temperature for a few minutes before scooping.
Special Equipment
To make your Orange Creamsicle Ice Cream, you will need the following tools:
– Ice Cream Maker: This is essential for churning and achieving that creamy texture you desire.
– Mixing Bowls: A couple of different-sized bowls are helpful for mixing and storing.
– Whisk: A whisk or a hand mixer will help you combine the ingredients smoothly.
– Airtight Container: For storing the ice cream once it’s churned and frozen.
Frequently Asked Questions
Can I make this ice cream without an ice cream maker?
Yes! You can freeze the mixture in a shallow container, stirring every 30 minutes until it reaches the desired texture.
How long does the ice cream last in the freezer?
If stored correctly, your homemade ice cream can last up to two weeks without losing its quality.
Is it possible to use store-bought juice?
While fresh juice is preferred for the best flavor, you can use store-bought if you’re in a pinch. Just ensure it’s 100% juice without added sugars.
Can I substitute other flavors?
Absolutely! Feel free to experiment with different fruit juices or flavorings to create your unique frozen dessert.
What can I do with leftover egg whites?
You can use them in meringues, omelets, or homemade macarons, so nothing goes to waste!
Conclusion
Making your own Orange Creamsicle Ice Cream from scratch is an enjoyable and rewarding culinary experience. The delightful combination of orange and vanilla flavors creates a delightful treat that captures the nostalgia of childhood. With easy-to-follow steps and tips for variations, freezing, and storage, you’re sure to impress family and friends alike. So, gather your ingredients, embrace your inner chef, and enjoy every refreshing scoop of this classic summer dessert.

Orange Creamsicle Ice Cream: An Incredible Ultimate Recipe
- Total Time: 40 minutes
Ingredients
– 2 cups heavy cream
– 1 cup whole milk
– 1 cup granulated sugar
– 1 tablespoon vanilla extract
– 1 cup orange juice (freshly squeezed for the best flavor)
– Zest of 1 orange
– 1/2 teaspoon salt
Instructions
Creating your own Orange Creamsicle Ice Cream is a straightforward process. Here are the steps to follow:
1. Combine Ingredients: In a large mixing bowl, combine the heavy cream, whole milk, and granulated sugar. Whisk until the sugar is fully dissolved.
2. Add Flavor: Stir in the vanilla extract, orange juice, orange zest, and salt. Ensure all ingredients are thoroughly mixed.
3. Chill the Mixture: Cover the bowl with plastic wrap and place it in the refrigerator for at least 2 hours. This step helps the flavors meld together and creates a smoother ice cream.
4. Churn the Ice Cream: Pour the chilled mixture into your ice cream maker. Follow the manufacturer’s instructions for churning, which typically takes about 20-25 minutes until it reaches a soft-serve consistency.
5. Transfer to Storage: Once churned, transfer the soft ice cream into an airtight container. Smooth the top with a spatula.
6. Freeze: Place the container in the freezer for an additional 2-4 hours to firm up the ice cream. This step is crucial for getting that scoopable texture.
7. Serve: Scoop out servings of your homemade Orange Creamsicle Ice Cream into bowls or cones.
Following these steps ensures that you achieve a creamy and refreshing treat that’s bursting with flavor!
- Prep Time: 15 minutes
- Cook Time: 25 minutes
Nutrition
- Serving Size: 8
- Calories: 300 kcal
- Fat: 20g
- Protein: 3g