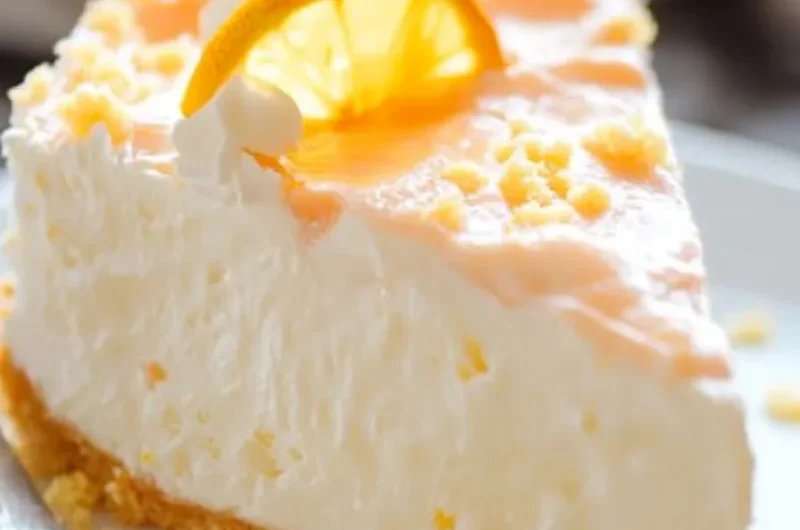
No Bake Orange Creamsicle Cheesecake is an incredible dessert that combines the nostalgic flavors of orange creamsicles with the creamy texture of cheesecake. This delightful treat is perfect for hot summer days, special occasions, or whenever you crave something light and refreshing. The best part? There’s no baking involved, making it super easy to whip up in no time. Your friends and family will be amazed at how you created such a delicious dessert without turning on the oven!
Imagine creamy, zesty orange filling resting atop a buttery graham cracker crust, harmonizing beautifully with whipped cream. Each bite takes you back to childhood summer days spent enjoying ice cream popsicles on warm afternoons. This No Bake Orange Creamsicle Cheesecake does just that while also bringing a touch of sophistication to your dessert table. It’s not just a dessert; it’s a way to evoke memories and bring joy to those you serve it to.
In this article, you will discover why this recipe stands out, its essential preparation and cooking time, a concise list of ingredients, step-by-step instructions, and tips on how to serve this amazing dessert. Whether you’re a beginner or an experienced baker, this is a dessert you will enjoy making and sharing. Let’s dive into the world of No Bake Orange Creamsicle Cheesecake!
Why You’ll Love This Recipe
No Bake Orange Creamsicle Cheesecake comes packed with delightful benefits that make it a must-try dessert. Here are several reasons why you’ll love this recipe:
1. Easy to Make: With no baking required, this cheesecake comes together effortlessly.
2. Perfect for All Occasions: Be it birthday parties, summer barbecues, or holiday gatherings, this cheesecake fits right in.
3. Refreshing Flavor: The zesty orange and creamy filling create a light and refreshing dessert that’s never heavy.
4. No-Fuss Ingredients: Most ingredients are common pantry staples, making it convenient to prepare.
5. Visually Stunning: Its vibrant orange hue and creamy texture create an impressive final presentation.
6. Kid-Friendly: Both kids and adults adore the nostalgic flavors of orange creamsicles, making it a crowd-pleaser.
These amazing qualities combine to make No Bake Orange Creamsicle Cheesecake an unforgettable dessert that everyone will enjoy.
Preparation and Cooking Time
Creating this delicious No Bake Orange Creamsicle Cheesecake is simple and quick. Here’s a breakdown of the time you’ll need for preparation and chilling:
– Preparation Time: 20 minutes
– Chilling Time: 4 hours (or overnight for best results)
These time estimates can vary slightly based on the ambient temperature and how quickly you work in the kitchen. But you’ll find that the majority of the time is just waiting for it to set, which is well worth it!
Ingredients
– 1 ½ cups graham cracker crumbs
– ½ cup unsalted butter, melted
– 2 cups cream cheese, softened
– 1 cup powdered sugar
– 1 cup heavy whipping cream
– 1 cup orange juice (freshly squeezed if possible)
– 2 teaspoons orange zest
– 1 teaspoon vanilla extract
– 2 tablespoons unflavored gelatin
– 1/4 cup cold water
– Optional: Whipped cream and orange slices for garnish
Step-by-Step Instructions
Making this No Bake Orange Creamsicle Cheesecake is straightforward and fun. Follow these easy steps:
1. Prepare the Crust: In a medium bowl, mix the graham cracker crumbs and melted butter until combined. Press the mixture firmly into the bottom of a 9-inch springform pan to form the crust.
2. Mix Cream Cheese: In a large mixing bowl, beat the softened cream cheese and powdered sugar together until smooth and creamy.
3. Add Flavorings: Stir in the orange juice, orange zest, and vanilla extract into the cream cheese mixture. Mix well until all ingredients are fully incorporated.
4. Prepare Gelatin: In a small bowl, dissolve the gelatin in cold water, letting it sit for about 5 minutes. Then, microwave it for approximately 10-15 seconds until fully dissolved. Stir this into the cream cheese mixture.
5. Whip Cream: In another bowl, whip the heavy cream until stiff peaks form. Gently fold the whipped cream into the cream cheese mixture until no white streaks remain, being careful not to deflate the whipped cream.
6. Combine Mixtures: Carefully pour the cream cheese mixture over the crust in the springform pan, smoothing the top with a spatula.
7. Chill: Cover the pan with plastic wrap and refrigerate for at least 4 hours or overnight until the cheesecake is set completely.
8. Release the Cake: Once set, carefully remove the sides of the springform pan.
9. Garnish: If desired, top with whipped cream and orange slices for a beautiful presentation.
These steps will lead you to a delicious and stunning No Bake Orange Creamsicle Cheesecake that everyone will love!
How to Serve
Serving your No Bake Orange Creamsicle Cheesecake beautifully can elevate the entire dessert experience. Here are some tips to consider:
1. Presentation: Use a cake stand to present the cheesecake. A simple garnish of whipped cream and a slice of orange can enhance its visual appeal.
2. Slice with Care: Use a sharp knife to cut clean slices. Dip the knife in warm water before cutting to achieve neat edges.
3. Accompany with Sides: Serve alongside fresh fruit salad or a scoop of vanilla ice cream for an extra indulgent treat.
4. Beverage Pairing: A refreshing glass of lemonade, iced tea, or even a sparkling water can complement the flavors beautifully.
5. Chill Before Serving: Keep the cheesecake chilled until ready to serve. This maintains its creamy texture.
By following these serving suggestions, you can create a delightful experience for your guests while showcasing the vibrant flavors of No Bake Orange Creamsicle Cheesecake!
Additional Tips
– Chill Thoroughly: Make sure to let the cheesecake chill for at least four hours. For best results, chill overnight to allow flavors to meld completely.
– Zest Wisely: Use a microplane to finely zest oranges, which enhances the flavor without adding any bitterness.
– Taste and Adjust: Before setting the cheesecake, taste the filling to check the sweetness and adjust accordingly.
– Garnishing: Experiment with toppings! Consider adding crushed graham crackers or a drizzle of chocolate for an unexpected twist.
– Serve Cold: For the best texture and flavor, serve your cheesecake cold right out of the fridge.
Recipe Variation
Get creative with these variations to suit your taste preferences:
1. Chocolate Orange Twist: Swirl in some chocolate ganache within the orange filling for a chocolate-orange flavor combo.
2. Different Citrus: Replace the orange juice and zest with lemon or lime for a refreshing citrus take.
3. Fruity Additions: Layer in fresh peaches, strawberries, or other fruits beneath the filling for extra flavor and texture.
4. Nutty Crust: Incorporate finely chopped nuts like almonds or walnuts into the crust for added crunch.
Freezing and Storage
– Refrigeration: Store any leftovers covered in the refrigerator. The cheesecake will keep well for up to five days.
– Freezing: You can freeze the cheesecake as well. Slice it into individual portions, wrap them in plastic wrap, and place them in a freezer-safe container. They will last for up to three months.
– Thawing: To serve frozen slices, move them to the refrigerator to thaw overnight before enjoying.
Special Equipment
Preparing your No Bake Orange Creamsicle Cheesecake requires only a few essential tools:
– Springform Pan: This will allow for easy removal and presentation of the cheesecake.
– Mixing Bowls: Essential for mixing your ingredients thoroughly.
– Electric Mixer: To make whipping cream and blending cream cheese a breeze.
– Measuring Cups and Spoons: Accurate measurements ensure a perfect cheesecake every time.
– Spatula: A rubber spatula will help in folding in the whipped cream and smoothing the top.
Frequently Asked Questions
Can I use low-fat cream cheese?
Yes, you can use low-fat cream cheese, though the texture may be slightly different.
Is it necessary to use gelatin?
Gelatin helps set the cheesecake. If seeking a vegetarian alternative, use agar-agar according to package instructions.
How do I know when the cheesecake is set?
If it feels firm to the touch and holds its shape after chilling, it’s ready to serve.
Can I make this recipe gluten-free?
Absolutely! Just substitute the graham cracker crumbs with gluten-free options or alternative crusts.
Is it possible to use store-bought crust?
Yes, you can save time by using a store-bought graham cracker crust. Adjust the recipe accordingly if necessary.
Conclusion
The No Bake Orange Creamsicle Cheesecake is the perfect dessert for any occasion, combining elements of nostalgia with a modern twist. Its refreshing flavors and creamy texture will delight your friends and family, making it an unforgettable treat. This dessert is not only easy to prepare but also a showstopper when served. Whether you stick with the classic version or try one of the exciting variations, this cheesecake is sure to bring joy and sweetness to your table. So grab your ingredients and get ready to impress everyone with this deliciously simple dessert!

No Bake Orange Creamsicle Cheesecake: An Amazing Ultimate Recipe
- Total Time: 20 minutes
Ingredients
– 1 ½ cups graham cracker crumbs
– ½ cup unsalted butter, melted
– 2 cups cream cheese, softened
– 1 cup powdered sugar
– 1 cup heavy whipping cream
– 1 cup orange juice (freshly squeezed if possible)
– 2 teaspoons orange zest
– 1 teaspoon vanilla extract
– 2 tablespoons unflavored gelatin
– 1/4 cup cold water
– Optional: Whipped cream and orange slices for garnish
Instructions
Making this No Bake Orange Creamsicle Cheesecake is straightforward and fun. Follow these easy steps:
1. Prepare the Crust: In a medium bowl, mix the graham cracker crumbs and melted butter until combined. Press the mixture firmly into the bottom of a 9-inch springform pan to form the crust.
2. Mix Cream Cheese: In a large mixing bowl, beat the softened cream cheese and powdered sugar together until smooth and creamy.
3. Add Flavorings: Stir in the orange juice, orange zest, and vanilla extract into the cream cheese mixture. Mix well until all ingredients are fully incorporated.
4. Prepare Gelatin: In a small bowl, dissolve the gelatin in cold water, letting it sit for about 5 minutes. Then, microwave it for approximately 10-15 seconds until fully dissolved. Stir this into the cream cheese mixture.
5. Whip Cream: In another bowl, whip the heavy cream until stiff peaks form. Gently fold the whipped cream into the cream cheese mixture until no white streaks remain, being careful not to deflate the whipped cream.
6. Combine Mixtures: Carefully pour the cream cheese mixture over the crust in the springform pan, smoothing the top with a spatula.
7. Chill: Cover the pan with plastic wrap and refrigerate for at least 4 hours or overnight until the cheesecake is set completely.
8. Release the Cake: Once set, carefully remove the sides of the springform pan.
9. Garnish: If desired, top with whipped cream and orange slices for a beautiful presentation.
These steps will lead you to a delicious and stunning No Bake Orange Creamsicle Cheesecake that everyone will love!
- Prep Time: 20 minutes
- Cook Time: 0 minutes
Nutrition
- Serving Size: 10
- Calories: 350 kcal
- Fat: 25g
- Protein: 4g